Friday, December 3, 2021


Be a flamingo in a flock of pigeons.


  I moved to Florida several years ago and have learned to love the vibe and way of life here.  When a friend gave me this pattern a few weeks back I had to make the little pillow to celebrate the season and my new way of life.

   The pattern is Fa-la-la-mingo from Say It With Applique.  It would have been an easy little afternoon,  if I had read the directions.  Note the placement of the bow tie.  In the pattern it is much higher on her neck, and there would be reason for that.  I jumped into the project, cut out the pieces, appliqued them on a little piece of grey cotton using  Heat n Bond, embroidered the HO HO HO and stood back to admire my work...I wondered why the neck was cut in two pieces, and then it dawned on me that I should have taped the pattern pieces together.  My eyes were drawn to the raw edges on the pieced neck, so I removed the bow tie and slid it down to cover the pieced fabric.  It was either this or a pearl necklace and it seemed to be the easiest option.
   So the moral of the story of my Florida Flamingo Pillow is this...If the pattern says to Read The Directions First, Do it.  Enough said.
   The pattern calls for a 16 inch pillow form.  I made 2 pillows and I the one that I cut to the pattern measurements needs a larger form.  I cut the cotton down for this pillow because I like them stuffed really tight.
   On to my next holiday project.

Sunday, November 28, 2021


Stashbuster Baby Quilt
 
The frame is the reward of the artist.  ~Edgar Degas

   I found myself looking in my closet full of fabric leftovers, asking myself what next?
   I started smallish little quilts, mostly for little girls because I have four granddaughters and the colors suited them.  I found this pattern, framed squares, online; I cannot really credit one particular source because this is such a common pattern, but as you can see here I used up lots of my favorite fun fabrics.  I liked working small, I guess because I'm new to quilting, and a fun new sewing genre was for me born! 


On my second one  I pieced the binding  and the result was a little bulkier than the printed stripe on the first one.  I also try to do something  fun on the back in the 
                                                                way of piecing.  
                                                         I'm looking forward to some new creations! 
After years of blogging inactivity, I'm relearning it so that I can share these little projects with a few friends and give myself reminders about what I've done how I did them!  

Sunday, January 14, 2018

Bits and Pieces, Joy and Sorrow


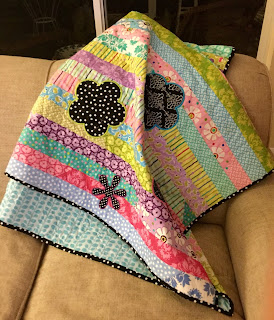
    I find myself with more time on my hands again; we all deal with life changes that we may not have expected but learn to cope with, nevertheless. I have had time to do a little sewing but no blogging, and I am beginning again with a special friend in mind.  Here is a quilt that I made on the run, in two states and with lots of help. 💗

Our lives are like quilts - bits and pieces, joy and sorrow, stitched with love.  

   I did not intend to make this little quilt; it kind of just happened.  On the way back from Florida a few years ago we stopped in the town of  Hahira and Lo and Behold I found myself in front of a fabric store.  I talked to the nicest lady for awhile, and found myself coming back to these strips of fabric in what she called a jelly roll.  You quilters must understand that for most of us garment sewers, we have no idea what a jelly roll is.  (in fact, when I worked at the sewing store, we got a phone call asking if we had jelly rolls and one of our non quilting shop ladies told her we weren't a bakery)  But I digress. I bought this beautiful jelly roll in fabrics of strong pastels, and it sat for a good little while in my stash.
   My approach to quilting was basic.  I did not know what I was really doing but I kept thinking it had to be easier than garment sewing, right?  Maybe not easier or harder, but very very different.  I finally googled jelly roll quilt and came up with a plan for a lap quilt.  After many phone calls and texts to my Texas buddy who makes lots of beautiful quilts, I finished.  I wanted to add the touches of black, so I used my Bernina Design Works Software to cut some black and white flowers and added them as appliques, then finished it off with a black and white polka dot border.
   As I have some time here in Florida, I will try to sew a little more and blog a little more, so that the buddies that I left can keep up with what I am doing.  Also, it gives me a way to reference what I have done in the way of settings and stitches so I can remember what I have done!

Tuesday, September 15, 2015

War Pups


For what avail the plough
 or sail, or land or life,
 if freedom fail?
              ~Ralph Waldo Emerson                               

   This little project is near and dear to my heart for so many reasons.  As  you can see there is nothing really complicated about it, but the cause just gives me warm fuzzies.  First of all, it was for my daughter's childhood best friend, and even though they have been separated by miles since their high school graduations, they continue to stay close and enjoy watching their children develop  friendships. 
    I never could have completed 50 of these little burp cloths without the help from friends, and a sweet friend from the company Darn It All digitized the design and  saw to it that the embroidery was completed.  This would have taken quite some time even on my speedy Bernina 780, with just one needle, so Linda had them completed  on a multi head machine.  Lin and her trusty little snips helped me cut lots of  stray threads.
  Most importantly, it is heartwarming to think of the little ones who will be wrapped in love by mommies wiping up spit ups and burps with these little cloths.
   And so many fine men came to mind as I sewed.  My father and Uncle Earl who were so proud to serve as marines.  Mary's husband and Lin's Daddy. Lots and lots of love went into this little project, that is for sure, andI loved doing it.

Wednesday, September 9, 2015

Easy Zip Pouch

Zip it Up!

     I'm going to teach a class of little girls soon, and during our last class one of the girls requested that they learn to put in a zipper.  I have made several different little pouches with zippers and have decided which one I will use for the class.  I loved a little one that was pieced, but decided it may be a little more difficult than it should be for a beginning sewist.

     I found this little pattern in the Kids' Clubhouse booklet from Babylock.  I thought it might look a little cuter with 2 different black and white fabrics, with the added touch of lime green.  It is made like any of the other fabric pouches that you can find on the internet, but before I sewed up the end seams, I rolled the pouch to get a top closure.  The 2 fabrics are cut 5" by 12", and a stabilizer was used to give the pouch a little structure.  You cannot see the quilting detail, but the fabric is quilted in 1" intervals.  When I make another I think I will use a little heavier interfacing to give the pouch some bulk.
     I'm looking forward to teaching zippers to my little girls, and hope to take away the fear of them that they all seem to feel.  Wish me luck, and I hope I have some cute examples to show you soon!


Wednesday, May 13, 2015

Infinity Scarves for 4 little girls

Infinity is love that never ends.

  ~Issa Allbritton, age 10

   We made these scarves for one of our Kids Sew Sunday classes at the store, but I had a difficult time separating them from Katelyn and Sarah.
   These scarves were made last winter at Katelyn's home in Birmingham. We measured the length by holding a tape measure from fingertip of the left hand to fingertip of the right hand, going around the neck.  That was the length.  We used a width of 6 inches for Katelyn's scarf and a width of 4 inches for Sarah's.  Then we sewed the loooong side seam,  leaving a space to turn it.  The part that makes this scarf twisty and interesting is sewing the ends together, but not matching the seams like you normally would.  We scooted the seam of one end about halfway around the circle instead .  
   The fun part is... putting the scarf over your head, looping it, and putting the second loop over your head, too.  :)


Wednesday, February 25, 2015

Its Mittens! Its a scarf! No! It's a SKITTEN!


                  Buttons and patches and the cold wind blowing,
                  The hours pass quickly when I am sewing.
                                               ~Author Unknown


                Vintage Winter Clip Art

Kathy sent me the idea for this class from Becky's Fabrics and Bernina, in Lewiston Idaho!  I actually called the store and asked if they minded if I used their scarf for a class, and they kindly agreed.  You can tell from the photos that you don't really need a pattern...the fun part of this scarf is the dreaded MINKY cloth!!

 My 4 little girls bravely tackled this project.  I cut out the fabric for them; this is a beginner class and I knew the Minky would slip and slide all over the table.  I determined the length by measuring Katelyn, with arms at her sides, from fingertip to fingertip around her neck.  this was the length of the scarf.  I then added an extra 12 inches so that I would have 6 inch pocket on each side, and another inch for seams.  Of course all of these measurements are approximate, but they seemed to work!

So I had 2 different Minkys that I cut to my measurements.  I used contrasting colors, and you can see that she really loves this turquoise and blue combination.  I then let the girls pin the scarves right sides together, we fitted them with pockets and they sewed these down.  Voila!  Not just a scarf, Not just mittens, but SKITTENS!

The saving grace in the construction of this scarf was a walking foot.  The entire scarf was sewn with one and I do think it might not have been possible without it.  A good time was had by all, and I hope that the scarves are being used these cold winter days.


Tuesday, January 27, 2015

I'm Back!


Do not follow where the path may lead.  
Go, instead, where there is no path and leave a trail. 
 ~Ralph Waldo Emerson


I took a blog vacation, but after spending some time looking through the past few years with my sewing and my girls, I decided I loved having this little keepsake to look back to from time to time.  They are growing so fast, now they are all loving little girls, no babies or toddlers.  My dress sewing time is limited I can see, but there is an entire world of fun projects to make  after that!


This past Christmas I knew they would want something a little more grown up.  I had decided on dark blue or navy when the American Girl catalog hit my mailbox.  On the front of the catalog was a sequined dress, with some netting and taffeta trim.  It was a little too frou frou for my taste, so I decided to tone it down a little.  I found a pretty blue taffeta from Gail K. on Cheshire Bridge Road, and they had a bolt of sequin fabric that I could use for the sash.  I did some quick figuring and purchased both.  I had in mind silk, but after looking at the price per yard times 4, I knew that was not going to be.

I used Children's Corner LOUISE for the dress; I had to make some pattern alterations for the largest size, but it seemed to come out fine.  I worried about the sash and sequins, but after trying a few different things, my dual feed on by wonderful Bernina 780 and a Titanium needle worked like a charm. 

So my Florida girls got their dresses in the mail, and only one went to Birmingham, as Katelyn politely declined the offer of a Bibi Christmas dress.  I have a picture of the Florida girls here in their dresses; they forgot to bring their dress shoes when they came for their Christmas visit, but I think I like the boots better anyway!

Thursday, August 21, 2014

Late Summer Sewing

Though inland far we be,
Our souls have sight of that immortal sea
Which brought us hither.
     
      ~William Wordsworth


  These little hands are so precious cutting out her first little zipper bag.  I  had some late summer  time with the Florida girls before school started so we decided to make pencil cases.  So far they have turned into lip gloss cases, change cases, treasure cases, and whatever is little and will fit cases.  We are all very proud.

We decided to google zipper cases so that we could make one any time, even if Bibi wasn't here to guide as we sewed.  We watched many videos on U-Tube, and combined several to make our cases  special.  Both girls chose their fabrics from Bibi's scraps, chose a lining that they like, and decorated the front of the case with ribbon and decorative stitches.  It was fun to practice the decorative stitches on the Bernina 350, and they used the guide foot to make their lines as straight as possible.
 We have had many discussions about straight pins on the floor, and right now we are using quilting pins that are easy to spot if they fall.  Uncle Brent has stories to tell about straight pins and bare feet as he was growing up, but we will not go into those stories right now.


It was absolutely AMAZING to put the zipper in between the rectangles of fabric.  Both girls have learned to sew nice straight seams!
 And we have learned that everything that you sew looks better when you take the time to press every seam as you go, but that you have to be careful with special ribbons or a hot iron will melt them!
 Of course, the joyful part for BIBI is to take a snapshot on the completion of the project.  We had a great afternoon sewing, and Issa wore a cross body bag that she designed on her own after Sew Camp.  She loves her little hair bow, too.
All of this fun is almost more than a Bibi can take in one afternoon!

Monday, August 18, 2014

Sew Fun


graphicsfairy.com

Learn as much as you can
while you are young,
since life becomes too busy later. 
                      ~Dana Stewart Scott

    I have had this post on my mind most of the summer.  I taught 3 little sewing camps; two at the store and one at home.  It took some time to plan, but I absolutely loved sharing my love of sewing with these little girls. They were so excited to have the opportunity to use a sewing machine and to create something that they could wear or use.  
   We did our camp in four days, four hours a day.   Our first day we made aprons that I had personalized with their name in embroidery.  The apron was made from a dish towel; we made a casing at the top and ran a ribbon through it for the ties; folded it to form pockets and sewed them down.  I think they were precious, and the girls enjoyed having something the very first day that they could wear.

Our next project was a travel pillow.  For the pillow I made sure that we had cute fabrics and a very basic pattern.  We added a pocket to the front of the pillow and the girls used an edge foot to sew the pocket down with a straight topstitch.  an added ribbon handle gave the project a little more color, and I know they used them for late summer vacations.  Turning the pillow and stuffing it was next, and a very difficult task was closing the opening on the bottom with a hand sewn whipstitch.  But they persevered and we we proud of our pillows.
     Our third day was buttons and bows.  We made hair bows that   we sewed to a ready made headband, and learned how to sew a button onto a felt flower.  Sweet Gracie went a step further with her button and made herself a ring!

Our final day was spent making a skirt.  Each girl chose two coordinating fabrics and we made a gathered skirt with a two inch band at the bottom.  Having precious models helped, but the fashion show with 5 little girls was a sight to behold!
  The sight of these little ones at their machines just warms my heart.  Everyone at the store said that it was evident who was enjoying the class the most....and I will give you a clue, it was not my little girls!