Sunday, August 18, 2013

Remember the time...?


Ah, How good it feels!  The hand of an old friend.
     ~  Henry Wadsworth Longfellow

Sue invited us to visit their mountain home in Arizona, and it was a lovely day.
The girls played in the woods, we rocked on the porch, talked over old times, and generally just enjoyed each other's company.

I wanted to do a little thank you for the day and I decided to do a word block on a kitchen towel.
I tried to include favorite memories, and used the software to place the words using various fonts.


I added an edgewalk underlay to most of the lettering through the Artista Software, worked with the colors to get an idea of how it would stitch out, and chose some little ornaments.  Harrington, Blackboard, Varsity, St. Charles and Anniversary are a few of the fonts that I used.


The stitch out was quick and easy.  I used two layers of tear-away on the back, and solvy on top.  I used a long strip of a cotton print that was the width of the towel and about 6 inches deep.  I folded it lengthwise, stitched it to the wrong side of the towel and pulled it forward, enclosing the ends of the stripe under the fabric.

I know Sue's friends and family will enjoy their mountain home with family and friends for many years to come!

Christmas in July....in August

Be merry all, be merry all,
With holly dress the festive hall;                                                
Prepare the song, 
the feast, the ball,
To welcome merry Christmas.

                   ~William Robert Spencer


I took this partially completed project home from the store intending to complete it for our Christmas in July event.  Needless to say, it did not get finished in time, so I pulled it out on a rainy day last week and finished it up.

     I was able to choose how I finished it;  I considered a pillow, but decided on a wall hanging.  The wreath didn't have a border, so I added strips with a green and red polka dot from my stash.  I used the #18 button sew on foot to add the button berries.  I am finally getting used to it, and I think when I have more than a few buttons to sew on at one time, I will be happy to have it.


To finish up the wreath, I made a tube out of a scrap of the green, turned it with the seam on the back, pressed it, and cut it in half.  I pinned these to the inside, with the loops facing inward. (how many times have I done that backwards?)

I had some bright green rick rack in my stash so I used that in the seam line between the lining and polka dot to give the hanging a little border.

Rather than using velcro to attach the tabs, I did buttonholes and once again buttons.  I attached it to the Merry Christmas hanger and took my photo.

( My next photo shows the broken lens line in the upper left corner, I am upset about it but not upset enough to ditch my iphone.)


This isn't my favorite project, but it could brighten a dull space on the wall during the Christmas Season.

Saturday, August 10, 2013

Chevron Sun Dress


 On manners of style, swim with the current,
on matters of principle, stand like a rock.
       ~ Thomas Jefferson    

This little dress from Olive Ann seemed to be the perfect pattern for Miss Mae, and I got a huge smile when I showed her the pattern and the fabric.  I wanted to do a pink/navy combination, but after rummaging through my stash I decided to go with the crisp navy and white, polka dot and chevron.


The pattern gives the option of a fully lined dress or a lining for the bodice, and I decided the just do the half lining.  When I put the polka dot behind the chevron, though, the navy was clearly visible on the white portion of the chevron.  I used a fusible woven interfacing on the bodice polka dot and that solved that little problem.
On the right is a photo of the front of the dress with the ruffle attached to the hem, and with the plain straps.  I thought it was really cute like this, and as I slipped it over her head for approval,....her response..."Bibi, can you put another ruffle up here?"  pointing to the neckline.  As tedious as the durned ruffle was to fool with, how could I say NO to that?
And I almost forgot to mention matching the chevrons.  Yikes!  It is absolutely necessary to do, and it is somewhat of a pain.  This dress was easier than most because of the simplicity,  but I carefully laid it out, getting both pieces as close to the same spot on the chevron as possible, and then matching the stripes at the quarter inch seam.


You know that I have a love affair with the Ruffler foot, #86, but this ruffle is gathered down the middle and finished on both sides.  Durn it!  So after cutting the ruffle to the correct length, I got the #68 foot, and finished both long sides of the ruffle.  I guided it carefully with with my left hand, held my mouth just right, and after a little practice I had long lengths of ruffle with nice little double folded hems.
I attached the ruffle to the neckline and straps, and I have to admit it is cute on her.  Mae Mae tickles me with her little poses in the dress, but she is very happy with it!  Her mommy posted this picture on Facebook.

Friday, July 19, 2013

Christmas in July


I will honor Christmas in my heart, and try to keep it all year.                    ~ Charles Dickens


For Christmas in July at the store, we each made an item to share with our customers.  I decided to make a little romper for
sweet little Sarah,  who may or may not decide that she wants to wear wear it!  It is the same romper that I made for her big sister and cousin last summer, and I thought this would look cute with a white t-shirt or turtle neck.

The pattern is from Bonnie Blue and this time when I made it I cut some fullness from the body.  I used 2 different cottons for the ruffles;  one is a red, pink and green print on white, the other is a lime green and white chevron.  I used a little different method for the ruffles on the bottom, drawing a line where the ruffle begins, attaching it carefully along the line, and then enclosing the raw edges from behind and covering them with a corduroy fold on the wrong side.  I used the # 86 ruffler for the ruffles along the bottom of the pants, but gathered the bodice ruffle the old fashioned way with gathering threads.


With the ruffler foot for this ruffle, I set the foot to gather each stitch, and then set the screw for a fairly shallow tuck.

I am now thinking about 3 more Christmas outfits...it is nice to have one behind me!

Sunday, June 30, 2013

New Zealand Skirt

The sunshine seemed to bless.
The air was a caress. 
~John Greenleaf Whittier


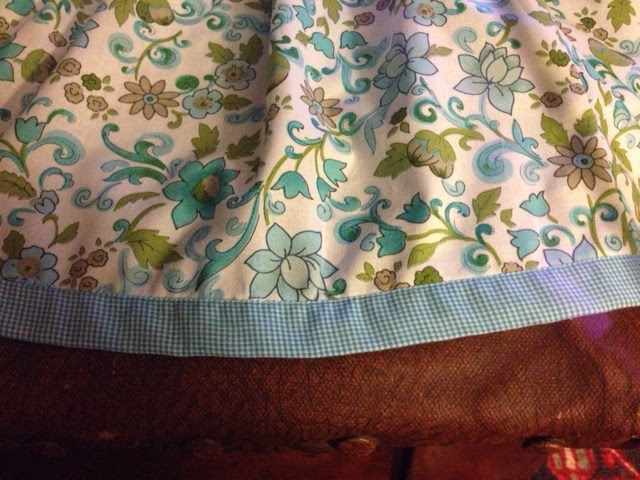
My girls love little summer skirts.  Issa brought one home from New Zealand, with big pockets on the sides that was precious.  Mandy and I went to my stash, found a pretty little floral print, and I got my tape measure. I measured the skirt in as many places as I could... around  the bottom of the hem, from the waistband to the hem, the length and width of the pocket panels, and the length of the fold inside the skirt.  It was really not to difficult to do,  and I couldn't wait to begin. 
 I started with the pocket panels.  I decided to use a contrasting fabric for the interior panel;  I folded it up, then placed the measured square on top of the panel, right sides together, and stitched them together.  I wanted to try and gather the front of the pocket like the original skirt, but it didn't work so I will try something different on the next one.  They kind of hang open like little kangaroo pockets, but we both liked the look.  From this point it was as simple as sewing up the sides, making a casing, and running the elastic through the casing.  the original skirt did not have trim on the bottom, but I added that.


  I am going to make this skirt again,  with one significant  change.  I got a little  bit lazy with the trim on the hem.  I thought since there were no curves, just straight seams, that I would not need bias strips; that I could use straight strips of the complimenting turquoise mini check as a trim along the hem of the skirt.  Au contraire!  Look at all the waves along the stitching.  I can press them out, but the next skirt will have bias strips as the trim.


Thursday, June 27, 2013

Saguaro or Agave?


The years between fifty and seventy are the hardest.  
You are always being asked
 to do more, and you are not
 yet decrepit enough to turn
them down.
       ~ T.S. Eliot, quoted in Time


     When I appliqued t-shirts for our Arizona vacation, I used the saguaro cactus.  At the time I didn't know that the saguaro didn't  grow in Sedona because it is too cold.  But they were cute little designs, they came from Linnie Pinnie and I thought they would be fun to do.   I used the Sugar and Spice  font for the lettering on their names.
     We learned a little about cactus on one of our tours.  I loved the story of the agave  or century plant.  It is not really a cactus, and it is used to make agave nectar and tequila.  But the wonderful thing is...it doesn't really show its stuff until it is around 60!


At some time after 60, it grows a huge stalk with blossoms, then the entire plant dies. 
I am hoping  to last a little longer than my 60s, but regardless of when I go,  I like the idea of saving my best for last!

Monday, June 17, 2013


When a man points a finger at someone else, 
he should remember that
 four of his fingers 
are pointing at himself.
~Louis Nizer  
    I have finished!  Four  (count 'em) four  little swim suit
cover-ups, all done!  I can't wait  to see the little girls in
 them together at the pool.
 
I did this cover-up alittle differently.
 I gathered the little skirt on my sewing machine,
 but I put the rest of it together using the serger.
  I am still learning how to use it, but it went
together so quickly, and the seams were
neat and clean.


I have a new font,Master Circle, and I love the way
that the letters can be intertwined.  It is going to take
practice moving the ends of each letter to the right spot,
 but I think the more I do it the easier it will be.
     The binding was made from 2 1/2 inch strips,
 folded lengthwiseand neatly pressed.
 I sewed them down matching the raw
edges from the wrong side, then turning
the fold to the front and sewing it down with the
number 10 edge foot.

I struggled a little making the patterns for these dresses
 because the pattern wasn't included in the information from
Crafter Hours.  Since I began the first one, she is offering a
pattern that is adaptable for boys and a straighter version for girls.
It would be sooo much easier with a pattern to follow.

I am hoping that my next post will be 4 girls  all covered up
  in their newbeach dresses!

Monday, June 10, 2013

Beach towel coverup # 3


Three things cannot be long hidden:
the sun, the moon, and the truth.  
                        ~ Buddha


Cover up number 3 is finished, done, complete!  3 down and 1 to go! Issa has her navy and orange, Mae has the purple and green, Little Sarah the pink, and Katelyn's blue and green is cut out, serged and ready to be put together.  Now all  I need is a photo of  the girls together in their cover ups by Bibi! 

Sunday, June 9, 2013

Ten Little Fingers, Ten Little Toes

Our lives are like quilts - bits and pieces,
 joy and sorrow, stitched with love.  
                          ~Author Unknown


     I have not yet had the opportunity to meet Everett, but I love his family so much; I was eager to make a little rag quilt so that he can be wrapped up on those cool mountain evenings.

     My first step in making this little quilt was to find  
blue and brown flannels and cut them into 6 inch squares.
I was reminded by this project that there are not NEARLY 
the number of choices for boys as their are for girls, 
but with visits to different fabric stores I was able to
come up with a nice variety of prints.     
     
                                                                                                                                                                             I cut warm and natural batting into 5 inch squares, then made my quilt sandwiches.
Since this was a baby quilt,  I made 63 sandwiches, making the quilt 7 sandwiches wide by 9 sandwiches long, just fine for a crib size.


      I quilted each sandwich together with diagonal lines from opposite corners and put his name, birth date, and some special names on several of the squares.  Next I sewed the squares together,  using half inch seams and sewing WRONG sides together.


Using special shears that are made for clipping these quilts, I carefully snipped at quarter inch intervals, but not going through the seam.  I washed and dried it twice to get the nice soft fuzzy look that makes a rag quilt so special.


I cannot wait to meet sweet Everett and give him a big Bibi hug.

Sunday, June 2, 2013

Chevron Pocket T-shirt Near Tragedy

 May your pockets be heavy and your heart be light,
 May good luck pursue you each morning and night.
~Irish Blessing

Presenting....Bibi Sews very own version of the Glamour Magazine Do's and Don't shots!   TA DA!  

DO 
DON'T
The lovely, lanky model in the DO shot is sporting a t shirt that fits, with the pocket placed in just the right 
spot!
The unfortunate looking, portly model in the DON'T shot wears a 3 sizes too small t shirt with a rather awkward looking pocket!  

I admit, I made this project more difficult that it needed to be.
1.  Next time I will embroider the fabric and then cut out the pocket;  even with 2 layers of stablilzer my stitching pulled the pocket inward, and many steam presses later it still retained a funny shape.
2.  I will check and recheck the placement before I stitch the pocket to the t-shirt.  I was able to remove the offending pocket by carefully cutting out the stitches, but it was VERY annoying.
3.  I will be more aware of the placement of the bottom line of chevron and the point of the pocket.

Nevertheless, it was a nice Saturday morning in my sewing room, with sweet Issa on my old Bernina 200 sewing away on her little doll quilt, while I struggled and muttered obscenities in the background.